The Tonder Ionic SDK Full is a solution for integrating our system into your mobile application. This solution ensures PCI DSS (Payment Card Industry Data Security Standard) by securely collecting and tokenizing sensitive data in the browser, without exposing your front-end infrastructure to any sensitive data. This guide will walk you through all the steps, from installation and configuring our SDK to fit your application.

Installation

Tonder’s Ionic SDK can be installed using our npm package. To do so, use the following command:
  npm i @tonder.io/ionic-full-sdk

Requirements

To configure our SDK you need to add the following script tags to your HTML:
  <script src="https://openpay.s3.amazonaws.com/openpay.v1.min.js"></script>
  <script src="https://openpay.s3.amazonaws.com/openpay-data.v1.min.js"></script>
The code above is necessary to ensure a reliable connection to the payment processor.
You can also install each one with their respective npm packages

Configuration

With Tonder’s SDK installed, and requirements met, you are ready to configure and use the SDK. The following step-by-step process takes you through everything, from starting a new instance, to performing a new transaction using the needed methods:
1

Mobile settings

Follow the instructions below to configure your mobile application for Android and iOS devices.
  • Android
  • iOS
To deploy your app on Android, you must add the Internet permission to your AndroidManifest.xml file. Add the following code to your XML:
  <!-- Required to fetch data from the internet. -->
  <uses-permission android:name="android.permission.INTERNET" />
2

Add the required ID to your HTML

Tonder’s Ionic SDK Full requires a tonder-checkout ID to work, which needs to be added to an empty div as shown below:
<div>
    <h1>Checkout</h1>
    <!-- You have to add an entry point with the ID 'tonder-checkout' -->
    <div id="tonder-checkout">
    </div>
</div>
3

Initialize Tonder's SDK Instance

Initialize Tonder’s Ionic SDK Full instance:
import { InlineCheckout } from "@tonder.io/ionic-full-sdk";

const apiKey = "You can find this in your Tonder Dashboard";
const returnUrl = "http://my-website:8080/checkout-success";

const inlineCheckout = new InlineCheckout({
  apiKey,
  returnUrl,
});
The InlineCheckout object includes all the functionalities of LiteCheckout and adds the capability to handle the rendering of the card payment form. InlineCheckout not only manages transactions but also facilitates the visual integration of the payment form in your application, providing a complete payment experience.
Below is a table of all parameters available, including the required ones for initialization:
PropertyTypeRequiredDescription
modestringEnvironment mode. Options: stage, production, sandbox. Default: stage
apiKeystring✔️The API key used for authentication and authorization.
returnUrlstring✔️The URL to which the user is redirected after the checkout process, regardless of success or failure.
renderPaymentButtonbooleanUse this flag if you need render Tonder’s default payment button. Default: false
styleobjectThe custom styles object to customize the checkout
containerIdstringIf a custom checkout container ID is required. Default value: tonder-checkout.
collectorIdsobjectIf you require custom div container IDs.
Default value:
{
  cardsListContainer: “cardsListContainer”,
  holderName: “collectCardholderName”,
  cardNumber: “collectCardNumber”,
  expirationMonth: “collectExpirationMonth”,
  expirationYear: “collectExpirationYear”,
  cvv: “collectCvv”,
  tonderPayButton: “tonderPayButton”,
  msgError: “msgError”,
  msgNotification: “msgNotification
}
callBackfunctionCallback function to be invoked after the payment process ends successfully.
isOpenpaySandboxbooleanDefines if Openpay works on the sandbox. Default value: true.
isEnrollmentCardbooleanUse the SDK as an enrollment card.
customizationobjectObject to customize the checkout behavior and UI. Default value:
{
  saveCards: {
    showSaved: true,
    showSaveCardOption: true,
    autoSave: false
  }
}
4

Inject checkout method

Call the 
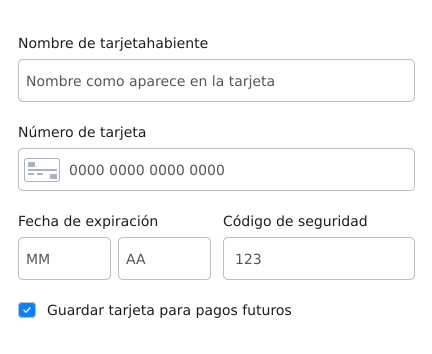
injectCheckout method with your inlineCheckout instance, with the code below:
inlineCheckout.injectCheckout();
This method will use the element with id tonder-checkout added in Step 2 to render the checkout elements, as exemplified by the image below:
With this, you can render the checkout to your customers.

Class Methods

After properly configuring your Full SDK instance, you have at your hand various methods to work with Tonder. Below you will find a detailed information about the checkout data needed with an example, and all the available methods in the SDK.

Configure Checkout

You can use the configureCheckout method to set initial customer information, such as their email address, allowing to retrieve the respectives user’s saved cards.
  inlineCheckout.configureCheckout(data);

Inject Checkout

The injectCheckout method is a function that allows you to incorporate Tonder’s Checkout feature into your application. This function leverages the element with the ID tonder-checkout that was added in Step 1 to display the checkout components on your page. To use this method, use the following code:
inlineCheckout.injectCheckout();

Payment

To create a new payment with the Lite SDK, use the payment method. This method requires an object as parameter with the following data:
KeyDescription
customerAn object containing customer information
cartAn object containing cart and item details
currencyThe currency code for the transaction (e.g., “MXN”)
metadataAn object for additional metadata (e.g., order ID)
cardAn object containing card details for a new card
payment_methodThe selected payment method (optional)
KeyDescription
firstNameCustomer’s first name
lastNameCustomer’s last name
countryCustomer’s country
addressCustomer’s street address
cityCustomer’s city
stateCustomer’s state or region
postCodeCustomer’s postal code
emailCustomer’s email address
phoneCustomer’s phone number
KeyDescription
totalTotal amount for the cart
itemsAn array of item objects
Item Object Structure:
KeyDescription
descriptionDescription of the product
quantityQuantity of the product
price_unitUnit price of the product
discountDiscount applied to the product
taxesTaxes applied to the product
product_referenceReference code for the product
nameName of the product
amount_totalTotal amount for this product (after discount and taxes)
KeyDescription
card_numberThe credit card number without spaces or dashes
cvvCard Verification Value (3 or 4-digit code)
expiration_monthCard’s expiration month (e.g., “12”)
expiration_yearCard’s expiration year (e.g., “25”)
cardholder_nameName on the credit card
Alternatively, if using a saved card, replace the card object with the saved card’s identifier:
card: "skyflow_id" // for a selected saved card.
Specify this key if using a different payment method instead of a card.
KeyDescription
payment_methodThe selected payment method (e.g., “Spei”)
KeyDescription
order_idUnique identifier for the order
With the required parameter in hand, call the method as presented below:
  const paymentData = {
    customer: {
      firstName: "John",
      lastName: "Doe",
      country: "USA",
      address: "123 Main St",
      city: "Anytown",
      state: "CA",
      postCode: "12345",
      email: "john.doe@example.com",
      phone: "1234567890",
    },
    cart: {
      total: "100.00",
      items: [
        {
          description: "Product description",
          quantity: 1,
          price_unit: "100.00",
          discount: "0.00",
          taxes: "0.00",
          product_reference: "PROD123",
          name: "Product Name",
          amount_total: "100.00",
        },
      ],
    },
    currency: "MXN",
    metadata: {
      order_id: "ORDER123",
    },
    // For a new card:
    card: {
      card_number: "4111111111111111",
      cvv: "123",
      expiration_month: "12",
      expiration_year: "25",
      cardholder_name: "John Doe",
    },
    // card: "skyflow_id" // for a selected saved card.
    // payment_method: "Spei", // For the selected payment method.
  };

  const responsePayment = await inlineCheckout.payment(paymentData);
The response to this method will be the following:
  {
    pk: number,
    order?: string,
    amount: string,
    status: string,
    date: string,
    paid_date?: string,
    shipping_address: {
      street: string,
      number: string,
      suburb: string,
      city: {
        name: string
      },
      state: {
        name: string,
        country: {
            name: string
        }
      },
      zip_code: string
    },
    shipping_address_id?: string,
    billing_address: {
      street: string,
      number: string,
      suburb: string,
      city: {
        name: string
      },
      state: {
        name: string,
        country: {
          name: string
        }
      },
      zip_code: string
    },
    billing_address_id?: string,
    client?: string,
    customer_order_reference?: string
  }

3DS Verification

You can use the verify3dsTransaction() method to validate if a 3DS challenge was successful or not. Use the example below to call the method and handle the response as needed:
  inlineCheckout.verify3dsTransaction().then(response => {
    console.log('Verify 3ds response', response);
    
    if (response.transaction_status === 'Success') {
      alert('3DS Transaction verified.');
      // Proceed with normal payment flow
    } else if (response.transaction_status === 'Failed') {
      alert('3DS Transaction Failed');
    }
  });

Save Card

You can use this method when using the SDK instance as an enrollment card feature with isEnrollmentCard.
inlineCheckout.saveCard();

Remove Checkout

Removes the checkout from the DOM and cleans up associated resources.
inlineCheckout.removeCheckout();

Set Payment Data

The setPaymentData method requires a checkoutData object as a parameter to pass checkout data to Tonder. This is useful when using the default Tonder payment button renderPaymentButton. Use the code example below to call it:
  inlineCheckout.setPaymentData(checkoutData);

Checkout Data

The payment function payload needs to be an object with detailed information about the customer, currency and cart. Below you find details abou each needed field:
FieldDescription
firstNameThe first name of the customer.
lastNameThe last name of the customer.
countryThe customer’s country of residence.
addressThe customer’s street address.
cityThe city of residence of the customer.
stateThe state or region within the country.
postCodeThe postal code or ZIP code of the customer’s address.
emailThe email address for communication with the customer.
phoneThe contact phone number of the customer.
FieldDescription
currencyThe currency used by the customer.
FieldDescription
totalThe total amount for the customer’s purchase.
itemsAn array containing details of individual items in the purchase.
items[n].descriptionThe description of the item.
items[n].quantityThe quantity of the item in the purchase.
items[n].price_unitThe unit price of the item.
items[n].discountThe discount applied to the item.
items[n].taxesThe taxes applied to the item.
items[n].product_referenceThe reference number of the product for the item.
items[n].nameThe name of the item (e.g., “T-Shirt”).
items[n].amount_totalThe total amount for the item.

Checkout Data Example

Below you find an example of a checkout data object:
  const checkoutData = {
    customer: {
      firstName: "Juan",
      lastName: "Hernández",
      country: "Mexico",
      address: "Av. Revolución 356, Col. Roma",
      city: "Monterrey",
      state: "Nuevo León",
      postCode: "64700",
      email: "juan.hernandez@mail.com",
      phone: "8187654321",
    },
    currency: 'mxn',
    cart: {
      total: 399,
      items: [
        {
          description: "Black T-Shirt",
          quantity: 1,
          price_unit: 1,
          discount: 0,
          taxes: 0,
          product_reference: 1,
          name: "T-Shirt",
          amount_total: 399,
        },
      ]
    }
  };

Styles

You can customize your checkout in two ways using Ionic SDK Full. You can either include a style parameter when creating the InlineCheckout instance or use HTML and CSS.
Below you will find more details about both options:

Include a Style Parameter

To include the checkout styles, add an object with the desired styles to the styles parameter when creating the instance, like presented below:
  const inlineCheckout = new InlineCheckout({
    apiKey,
    returnUrl,
    styles: customStyles
  });
All available customizations are presented in the example below:
  const customStyles = {
    inputStyles: {
      base: {
        border: "1px solid #e0e0e0",
        padding: "10px 7px",
        borderRadius: "5px",
        color: "#1d1d1d",
        marginTop: "2px",
        backgroundColor: "white",
        fontFamily: '"Inter", sans-serif',
        fontSize: '16px',
        '&::placeholder': {
          color: "#ccc",
        },
      },
      cardIcon: {
        position: 'absolute',
        left: '6px',
        bottom: 'calc(50% - 12px)',
      },
      complete: {
        color: "#4caf50",
      },
      empty: {},
      focus: {},
      invalid: {
        border: "1px solid #f44336",
      },
      global: {
        '@import': 'url("https://fonts.googleapis.com/css2?family=Inter:wght@300;400;500;700&display=swap")',
      }
    },
    labelStyles: {
      base: {
        fontSize: '12px',
        fontWeight: '500',
        fontFamily: '"Inter", sans-serif'
      },
    },
    errorTextStyles: {
      base: {
        fontSize: '12px',
        fontWeight: '500',
        color: "#f44336",
        fontFamily: '"Inter", sans-serif'
      },
    },
    labels: {
      cardLabel: 'Número de Tarjeta Personalizado',
      cvvLabel: 'Código de Seguridad',
      expiryMonthLabel: 'Mes de Expiración',
      expiryYearLabel: 'Año de Expiración'
    },
    placeholders: {
      cardPlaceholder: '0000 0000 0000 0000',
      cvvPlaceholder: '123',
      expiryMonthPlaceholder: 'MM',
      expiryYearPlaceholder: 'AA'
    }
  }

HTML and CSS

To customize your checkout using HTML and CSS, you can use predefined classes in your HTML and customize them in the CSS. The styles parameter is related to the style of the inputs inside the checkout form. To customize the checkout container and the cards list, you can use the global styles and classes presented below:
  @import url("https://fonts.googleapis.com/css2?family=Inter:wght@300;400;500;700&display=swap");

  .container-tonder {
    background-color: #F9F9F9;
    margin: 0 auto;
    padding: 30px 10px 30px 10px;
    overflow: hidden;
    transition: max-height 0.5s ease-out;
    max-width: 600px;
    border: solid 1px #e3e3e3;
  }

  .collect-row {
    display: flex;
    justify-content: space-between;
    width: 100%;
  }

  .collect-row > :first-child {
    min-width: 120px;
  }

  .expiration-year {
    padding-top: 25px;
  }

  .empty-div {
    height: 80px;
    margin-top: 2px;
    margin-bottom: 4px;
    margin-left: 10px;
    margin-right: 10px;
  }

  .error-container{
    color: red;
    background-color: #FFDBDB;
    margin-bottom: 13px;
    font-size: 80%;
    padding: 8px 10px;
    border-radius: 10px;
    text-align: left;
  }

  .message-container{
    color: green;
    background-color: #90EE90;
    margin-bottom: 13px;
    font-size: 80%;
    padding: 8px 10px;
    border-radius: 10px;
    text-align: left;
  }

  .pay-button {
    font-size: 16px;
    font-weight: bold;
    min-height: 2.3rem;
    border-radius: 0.5rem;
    cursor: pointer;
    width: 100%;
    padding: 1rem;
    text-align: center;
    border: none;
    background-color: #000;
    color: #fff;
    margin-bottom: 10px;
    display: none;
  }

  .pay-button:disabled, pay-button[disabled] {
    background-color: #B9B9B9;
  }

  .lds-dual-ring {
    display: inline-block;
    width: 14px;
    height: 14px;
  };

  .lds-dual-ring:after {
    content: " ";
    display: block;
    width: 14px;
    height: 14px;
    border-radius: 50%;
    border: 6px solid #fff;
    border-color: #fff transparent #fff transparent;
    animation: lds-dual-ring 1.2s linear infinite;
  }

  @keyframes lds-dual-ring {
    0% {
      transform: rotate(0deg);
    }
    100% {
      transform: rotate(360deg);
    }
  }

  @media screen and (max-width: 600px) {
    .payment_method_zplit {
      font-size: 16px;
      width: 100%;
    }

    .payment_method_zplit  label img {
      display: none;
    }
  }

  .cards-list-container {
    display: flex;
    flex-direction: column;
    padding: 0px 10px 0px 10px;
    gap: 33% 20px;
  }

  .checkbox label {
    margin-left: 10px;
    font-size: '12px';
    font-weight: '500';
    color: #1D1D1D;
    font-family: "Inter", sans-serif;
  }

  .checkbox {
    margin-top: 10px;
    margin-bottom: 10px;
    width: 100%;
    text-align: left;
  }

  .pay-new-card {
    display: flex;
    justify-content: start;
    align-items: center;
    color: #1D1D1D;
    gap: 33% 20px;
    margin-top: 10px;
    margin-bottom: 10px;
    padding-left: 10px;
    padding-right: 10px;
    width: 90%;
  }

  .pay-new-card .card-number {
    font-size: 16px;
    font-family: "Inter", sans-serif;
  }

  .card-image {
    width: 27px;
    height: 20px;
    text-align: left;
  }

  .card-item-label {
    display: flex;
    justify-content: start;
    align-items: center;
    color: #1D1D1D;
    gap: 33% 20px;
    margin-top: 10px;
    margin-bottom: 10px;
    padding-left: 10px;
    padding-right: 10px;
    width: 90%;
  }

  .card_selected {
    width: 10%;
  }

  .card-item {
    display: flex;
    justify-content: start;
    align-items: center;
    gap: 33% 20px;
  }

  .card-item .card-number {
    font-size: 16px;
    font-family: "Inter", sans-serif;
  }

  .card-item .card-expiration {
    font-size: 16px;
    font-family: "Inter", sans-serif;
  }
The classes presented above are included as example in the HTMLs presented below:
  <div class="container-tonder">
    <div class="cards-list-container"></div>
    <div class="pay-new-card">
      <input checked id="new" name="card_selected" type="radio"/>
      <label for="new">
        <img class="card-image"/>
        <div class="card-number"></div>
      </label>
    </div>
    <div class="container-form">
      <div class="empty-div"></div>
      <div class="empty-div"></div>
      <div class="collect-row">
        <div class="empty-div"></div>
        <div class="expiration-year"></div>
        <div class="empty-div"></div>
      </div>
      <div class="checkbox">
        <input id="save-checkout-card" type="checkbox">
        <label for="save-checkout-card"></label>
      </div>
      <div></div>
      <div></div>
    </div>
    <button class="pay-button"></button>
  </div>
  <div class="card-item">
    <input name="card_selected" type="radio"/>
    <label class="card-item-label">
      <img class="card-image"/>
      <div class="card-number"></div>
      <div class="card-expiration"></div>
    </label>
  </div>

Full Integration Example

Below you find full example codes to integrate the Ionic SDK Full:
For Angular, we recommend using a service to manage the Tonder instance:
// tonder.service.ts
import { Injectable } from "@angular/core";
import { InlineCheckout } from "@tonder.io/ionic-full-sdk";
import {IInlineCheckout} from "@tonder.io/ionic-full-sdk/dist/types/inlineCheckout";

@Injectable({
  providedIn: "root",
})
export class TonderService {
  private inlineCheckout: IInlineCheckout;

  constructor(@Inject(Object) private sdkParameters: IInlineCheckoutOptions) {
    this.initializeInlineCheckout();
  }

  private initializeInlineCheckout(): void {
    this.inlineCheckout = new InlineCheckout({ ...this.sdkParameters });
  }

  configureCheckout(customerData: IConfigureCheckout): void {
    return this.inlineCheckout.configureCheckout({ ...customerData });
  }

  async injectCheckout(): Promise<void> {
    return await this.inlineCheckout.injectCheckout();
  }

  verify3dsTransaction(): Promise<ITransaction | IStartCheckoutResponse | void> {
    return this.inlineCheckout.verify3dsTransaction();
  }

  payment(
      checkoutData: IProcessPaymentRequest
  ): Promise<IStartCheckoutResponse> {
      return this.inlineCheckout.payment(checkoutData);
  }
  
  removeCheckout(): void {
      return this.inlineCheckout.removeCheckout();
  }
}
Checkout component:
// checkout.component.ts
import { Component, OnInit, OnDestroy } from "@angular/core";
import { TonderService } from "./tonder.service";

@Component({
  selector: "app-tonder-checkout",
  template: `
    <div id="tonder-checkout"></div>
    <button (click)="pay()" [disabled]="loading">
      {{ loading ? "Processing..." : "Pay" }}
    </button>
  `,
  providers: [
    {
      provide: TonderInlineService,
        // Initialization of the Tonder Inline SDK.
        // Note: Replace these credentials with your own in development/production.
      useFactory: () =>
        new TonderInlineService({
          apiKey: "11e3d3c3e95e0eaabbcae61ebad34ee5f93c3d27",
          returnUrl: "http://localhost:8100/tabs/tab1",
          mode: "stage",
        }),
    },
  ],
})

export class TonderCheckoutComponent implements OnInit, OnDestroy {
  loading = false;
  checkoutData: IProcessPaymentRequest;

  constructor(private tonderService: TonderService) {
      this.checkoutData = {
          customer: {
              firstName: "Jhon",
              lastName: "Doe",
              email: "john.c.calhoun@examplepetstore.com",
              phone: "+58452258525"
          },
          cart: {
              total: 25,
              items: [
                  {
                      description: "Test product description",
                      quantity: 1,
                      price_unit: 25,
                      discount: 1,
                      taxes: 12,
                      product_reference: 89456123,
                      name: "Test product",
                      amount_total: 25
                  }
              ]
          },
          metadata: {},
          currency: "MXN"
      }
  }

  ngOnInit() {
    this.initCheckout();
  }

  ngOnDestroy() {
    // Clear the checkout upon destroying the component.
    this.tonderService.removeCheckout();
  }

  async initCheckout() {
    this.tonderService.configureCheckout({
      customer: { email: "example@email.com" },
    });
    await this.tonderService.injectCheckout();
    this.tonderService.verify3dsTransaction().then((response) => {
      console.log("Verify 3ds response", response);
    });
  }

  async pay() {
    this.loading = true;
    try {
      const response = await this.tonderService.payment(this.checkoutData);
      console.log("Payment successful:", response);
      alert("Payment successful");
    } catch (error) {
      console.error("Payment failed:", error);
      alert("Payment failed");
    } finally {
      this.loading = false;
    }
  }
}
For Angular, we recommend using a service to manage the Tonder instance:
// tonder.service.ts
import { Injectable } from "@angular/core";
import { InlineCheckout } from "@tonder.io/ionic-full-sdk";
import {IInlineCheckout} from "@tonder.io/ionic-full-sdk/dist/types/inlineCheckout";

@Injectable({
  providedIn: "root",
})
export class TonderService {
  private inlineCheckout: IInlineCheckout;

  constructor(@Inject(Object) private sdkParameters: IInlineCheckoutOptions) {
    this.initializeInlineCheckout();
  }

  private initializeInlineCheckout(): void {
    this.inlineCheckout = new InlineCheckout({ ...this.sdkParameters });
  }

  configureCheckout(customerData: IConfigureCheckout): void {
    return this.inlineCheckout.configureCheckout({ ...customerData });
  }

  async injectCheckout(): Promise<void> {
    return await this.inlineCheckout.injectCheckout();
  }

  async saveCard(): Promise<string> {
    return await this.inlineCheckout.saveCard();
  }
  
  removeCheckout(): void {
      return this.inlineCheckout.removeCheckout();
  }
}
Enrollment component:
// enrollment.component.ts
import { Component, OnInit, OnDestroy } from "@angular/core";
import { TonderService } from "./tonder.service";

@Component({
  selector: "app-tonder-enrollment",
  template: `
    <div id="container">
      <form id="payment-form">
        <div id="tonder-checkout-enrollment"></div>
      </form>
      <button class="external-payment-button" (click)="onSave($event)">Guardar</button>
    </div>
  `,
  providers: [
    {
      provide: TonderInlineService,
        // Initialization of the Tonder Inline SDK.
        // Note: Replace these credentials with your own in development/production.
      useFactory: () =>
        new TonderInlineService({
          apiKey: "11e3d3c3e95e0eaabbcae61ebad34ee5f93c3d27",
          returnUrl: "http://localhost:8100/tabs/tab1",
          mode: "stage",
        }),
    },
  ],
})

export class TonderCheckoutComponent implements OnInit, OnDestroy {
  loading = false;
  customerData: IProcessPaymentRequest;

  constructor(private tonderService: TonderService) {
      this.customerData = {
          customer: {
              firstName: "Pedro",
              lastName: "Perez",
              country: "Finlandia",
              street: "The street",
              city: "The city",
              state: "The state",
              postCode: "98746",
              email: "jhon.doe@example.com",
              phone: "+58 4169855522"
          }
      }
  }

  ngOnInit() {
    this.initCheckout();
  }

  ngOnDestroy() {
    // Clear the checkout upon destroying the component.
    this.tonderService.removeCheckout();
  }

  async initCheckout() {
    this.tonderService.configureCheckout({
      customer: { email: "example@email.com" },
    });
    await this.tonderService.injectCheckout();
  }

  async onSave(event: any) {
      await this.tonderService.saveCard()
  }
}
I