This tutorial guides you through the Hosted Checkout flow, from creating a payment session to verifying a successful payment.
By the end, you will be able to:
- Create a payment session with the Tonder API.
- Redirect a customer to the checkout URL.
- Complete a test payment.
- Check the status of the payment.
All examples use test environment URLs. Make sure to use your Test API Keys for this guide. Never use your production keys for testing.
Integration Flow Overview
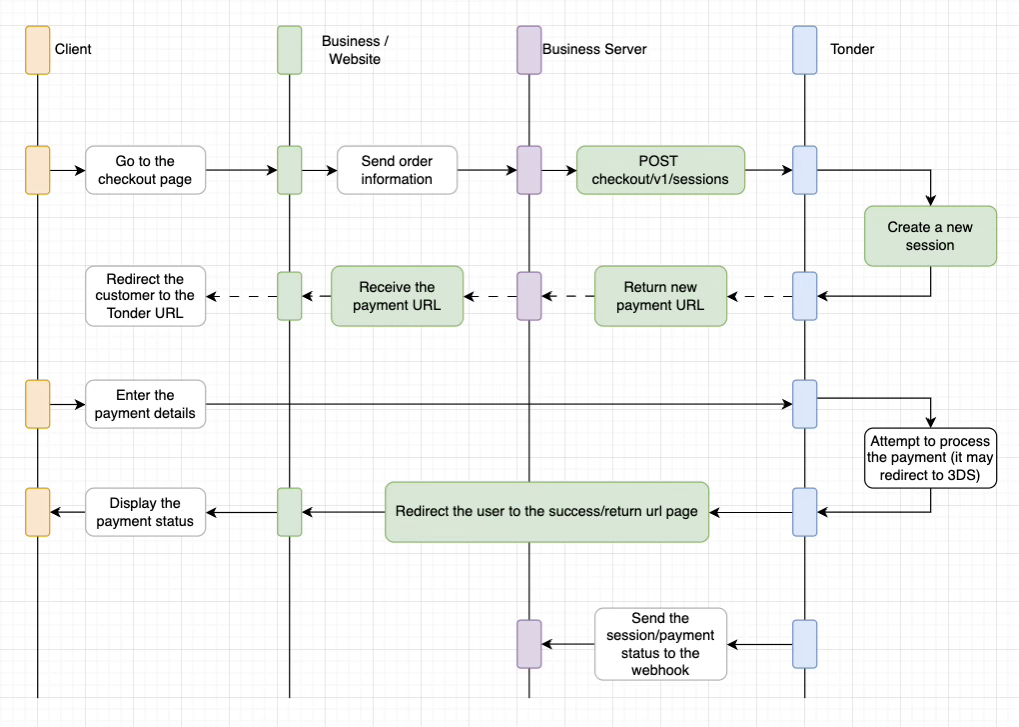
The diagram below shows the complete flow between your customer, your application, and Tonder’s services. This quickstart guide will walk you through implementing each numbered step in the diagram:

Step 1: Create a Payment Session
First, call the Create a Payment Session endpoint from your server. This endpoint registers the payment details with Tonder and returns a secure URL for you to redirect your customer to. The request must include the following fields:
| Field | Description | Example |
|---|
| customer | Customer information including first name, last name, and email | Object with first_name, last_name, email fields |
| amount_total | The total charge amount | 15000 (for $150.00) |
| currency | The ISO currency code | ”MXN” |
| line_items | An array of line items describing the products in the cart | Array of objects with name, quantity, unit_price |
| return_url | URL to redirect customer after payment (can also use success_url) | “https://your-store.com/checkout/complete” |
| external_id | (Optional) Your internal order ID | ”YOUR-UNIQUE-ORDER-ID-123” |
curl -X POST 'https://api-stage.tonder.io/checkout/v1/sessions' \
  -H 'Authorization: Token YOUR_API_KEY' \
  -H 'Content-Type: application/json' \
  -d '{
    "customer": {
      "first_name": "Jane",
      "last_name": "Doe",
      "email": "[email protected]"
    },
    "amount_total": 15000,
    "currency": "MXN",
    "line_items": [
      {
        "name": "Test Product",
        "quantity": 1,
        "unit_price": 15000
      }
    ],
    "return_url": "https://your-store.com/checkout/complete",
    "external_id": "YOUR-UNIQUE-ORDER-ID-123"
  }'
url field in the response:
{
  "id": "cs_97_41521_d11ba771527b4056c7f85786cfbb980bc105efaf42af113d",
  "url": "https://stage-payflow.tonder.io/checkout/cs_97_41521_d11ba771527b4056c7f85786cfbb980bc105efaf42af113d",
  "status": "pending",
  "payment_id": 41521,
  "amount_total": 15000,
  "currency": "MXN",
  "external_id": "YOUR-UNIQUE-ORDER-ID-123",
  "transaction_status": "Pending",
  "created_at": 1751478543567
}
Step 2: Redirect Your Customer to Tonder
Take the url from the response and redirect your customer to Tonder’s Hosted Checkout page. In a standard web application, this is typically done with an HTTP 302 redirect. This example shows a simple redirect in a Node.js/Express server:
Step 3: Complete the Test Payment
The customer is now on the Tonder Hosted Checkout page, where they can enter their payment details. Tonder handles the payment verification with the acquiring bank and 3DS authentication automatically. If a payment is declined, the customer can retry with a different card on the same page.
To complete the test payment, follow these steps:
- Fill in the payment form with test data.
- Use a Tonder test card number available in the Tonder Dashboard under Developers > Test Data.
- Use any future expiration date, such as 12/30.
- Use any 3-digit CVC, such as 123.
After submitting, Tonder processes the payment, verifies it with the payment provider, and redirects the customer to the return_url or success_url you provided.
Step 4: Verify the Payment Status
After Tonder redirects the customer back to your site, you should verify the payment status server-side before displaying a confirmation page. When the customer lands on your return_url or success_url, the URL will include the session ID as a query parameter:
https://your-store.com/checkout/success?session_id=cs_97_41521_d11ba771527b4056c7f85786cfbb980bc105efaf42af113d
session_id to call the Get a Session endpoint from your server to securely fetch the final status of the payment. This is more reliable than just assuming the success_url means payment was successful. This example demonstrates how to retrieve the session status:
curl -X GET 'https://api-stage.tonder.io/checkout/v1/sessions/cs_97_41521_d11ba771527b4056c7f85786cfbb980bc105efaf42af113d' \
  -H 'Authorization: Token YOUR_API_KEY'
{
  "id": "cs_97_41521_d11ba771527b4056c7f85786cfbb980bc105efaf42af113d",
  "url": "https://stage-payflow.tonder.io/checkout/cs_97_41521_d11ba771527b4056c7f85786cfbb980bc105efaf42af113d",
  "status": "completed",
  "payment_id": 41521,
  "amount_total": 15000,
  "currency": "MXN",
  "external_id": "YOUR-UNIQUE-ORDER-ID-123",
  "transaction_status": "Success",
  "paid_at": 1751478550234
}
Next Steps
You’ve successfully processed a test payment! Here are the recommended next steps:
- Set up webhooks for the most reliable way to get payment updates. While manual checking works, webhooks are recommended.
- Customize the checkout page to match your brand identity.


