> ## Documentation Index
> Fetch the complete documentation index at: https://docs.tonder.io/llms.txt
> Use this file to discover all available pages before exploring further.
# Make a Payment
This guide walks you through processing a payment using the JS Inline SDK (`InlineCheckout`) for web applications. You'll learn how to initialise the SDK, configure payment data, display the checkout interface, and handle the complete payment flow including 3D Secure verification.
The JS Inline SDK is designed for quick, single-transaction payments and does not directly expose methods for enrolling or managing saved cards. Its primary purpose is to provide a complete, out-of-the-box checkout UI.
To securely save and manage customer payment methods, you must use the [JS Lite SDK](/sdk-integration/web/js-lite/enroll-payment-method), which provides the necessary methods and requires a custom UI.
## Prerequisites
Before you can process payments with the Tonder JS Inline SDK, ensure you have completed the necessary setup and have the required components in place.
* You have successfully [installed the Tonder JS SDK](/sdk-integration/web/js-inline/installation).
* You have a checkout page on your website with an empty `div` and a button.
Ensure your checkout page includes the required HTML elements for the SDK integration. The `div` with the `tonder-checkout` ID will serve as the container where the payment form will be rendered, while the button will trigger the payment process.
```html theme={null}
```
## Payment Integration Steps
Follow these steps to integrate payment processing into your web application. This process involves initialising the SDK, configuring payment data, displaying the checkout interface, and processing the transaction.
### Step 1: Initialize the SDK
Create an instance of the `InlineCheckout` class to establish a secure connection with Tonder's payment services. This initialisation configures the SDK with your API credentials and sets up the operating mode for your environment. Finally, the initialization should mention the optional signatures parameter for HMAC validation.
```javascript NPM Package Option theme={null}
import { InlineCheckout } from "tonder-web-sdk";
const inlineCheckout = new InlineCheckout({
apiKey: 'YOUR_API_KEY',
returnUrl: 'https://your-website.com/return',
mode: 'development',
signatures: { // Optional: for backend HMAC validation
transaction: "nA6nQXxQ....=", // Optional HMAC signature for transaction
customer: "2EVYDIOH515v4....=" // Optional HMAC signature for customer
}
});
```
### Step 2: Inject the Checkout UI
Render the pre-built checkout interface within your designated container. The `injectCheckout()` method creates and displays the complete payment form with card input fields, validation, and styling.
```javascript theme={null}
inlineCheckout.injectCheckout();
```
### Step 3: Process the Payment
Configure the payment processing by adding an event listener to your payment button. When clicked, the SDK will collect the payment data and initiate the secure transaction process.
```javascript theme={null}
document.getElementById('pay-button').addEventListener('click', async () => {
const checkoutData = {
customer: { firstName: "Juan", email: "juan.hernandez@mail.com" },
currency: 'mxn',
cart: { total: 399, items: [{ name: "T-Shirt", amount_total: 399 }] }
};
try {
const response = await inlineCheckout.payment(checkoutData);
alert('Payment successful!');
} catch (error) {
alert('Payment failed.');
}
});
```
### Step 4: Handle 3DS Verification
If a 3D Secure challenge is required, the SDK will automatically handle the redirection process. After the user returns to your returnUrl, call `verify3dsTransaction()` to get the final transaction status.
```javascript theme={null}
// On your return page
inlineCheckout.verify3dsTransaction().then(response => {
if (response.transaction_status === 'Success') {
alert('3DS Transaction successful!');
}
});
```
## Next Steps
Now that you've successfully integrated payment processing into your web application, explore these advanced features to enhance your payment experience:
* Explore the [available SDK methods](/sdk-integration/web/js-inline/methods) for advanced payment operations.
* Customise the [SDK appearance and behavior](/sdk-integration/web/js-inline/customization) to match your website's design.
* Learn how to [enroll payment methods](/sdk-integration/web/js-lite/enroll-payment-method) for returning customers using the JS Lite SDK.
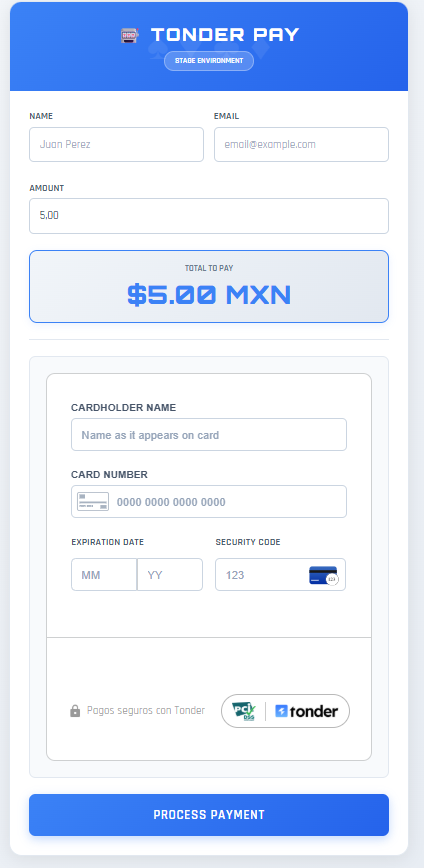 ### Step 3: Process the Payment
Configure the payment processing by adding an event listener to your payment button. When clicked, the SDK will collect the payment data and initiate the secure transaction process.
```javascript theme={null}
document.getElementById('pay-button').addEventListener('click', async () => {
const checkoutData = {
customer: { firstName: "Juan", email: "juan.hernandez@mail.com" },
currency: 'mxn',
cart: { total: 399, items: [{ name: "T-Shirt", amount_total: 399 }] }
};
try {
const response = await inlineCheckout.payment(checkoutData);
alert('Payment successful!');
} catch (error) {
alert('Payment failed.');
}
});
```
### Step 4: Handle 3DS Verification
If a 3D Secure challenge is required, the SDK will automatically handle the redirection process. After the user returns to your returnUrl, call `verify3dsTransaction()` to get the final transaction status.
```javascript theme={null}
// On your return page
inlineCheckout.verify3dsTransaction().then(response => {
if (response.transaction_status === 'Success') {
alert('3DS Transaction successful!');
}
});
```
## Next Steps
Now that you've successfully integrated payment processing into your web application, explore these advanced features to enhance your payment experience:
* Explore the [available SDK methods](/sdk-integration/web/js-inline/methods) for advanced payment operations.
* Customise the [SDK appearance and behavior](/sdk-integration/web/js-inline/customization) to match your website's design.
* Learn how to [enroll payment methods](/sdk-integration/web/js-lite/enroll-payment-method) for returning customers using the JS Lite SDK.
### Step 3: Process the Payment
Configure the payment processing by adding an event listener to your payment button. When clicked, the SDK will collect the payment data and initiate the secure transaction process.
```javascript theme={null}
document.getElementById('pay-button').addEventListener('click', async () => {
const checkoutData = {
customer: { firstName: "Juan", email: "juan.hernandez@mail.com" },
currency: 'mxn',
cart: { total: 399, items: [{ name: "T-Shirt", amount_total: 399 }] }
};
try {
const response = await inlineCheckout.payment(checkoutData);
alert('Payment successful!');
} catch (error) {
alert('Payment failed.');
}
});
```
### Step 4: Handle 3DS Verification
If a 3D Secure challenge is required, the SDK will automatically handle the redirection process. After the user returns to your returnUrl, call `verify3dsTransaction()` to get the final transaction status.
```javascript theme={null}
// On your return page
inlineCheckout.verify3dsTransaction().then(response => {
if (response.transaction_status === 'Success') {
alert('3DS Transaction successful!');
}
});
```
## Next Steps
Now that you've successfully integrated payment processing into your web application, explore these advanced features to enhance your payment experience:
* Explore the [available SDK methods](/sdk-integration/web/js-inline/methods) for advanced payment operations.
* Customise the [SDK appearance and behavior](/sdk-integration/web/js-inline/customization) to match your website's design.
* Learn how to [enroll payment methods](/sdk-integration/web/js-lite/enroll-payment-method) for returning customers using the JS Lite SDK.