> ## Documentation Index
> Fetch the complete documentation index at: https://docs.tonder.io/llms.txt
> Use this file to discover all available pages before exploring further.
# JS Inline Checkout
Tonder's JS SDK Inline Checkout brings you a easy to integrate, pre-built, customizable interface. This guide will take you step-by-step into integrating it.
If you haven't installed and pre-configured Tonder's JS SDK, refer to the [Installation guide here](/integration/sdks/web/js-sdk).
## Configuration
Before initializing an instance of Tonder SDK, ensure that you have configured it properly. Follow the usage example below:
Tonder's JS SDK needs an entry point to operate. This entry point is defined by adding a `tonder-checkout` ID to an empty `div`, like the example below:
```html theme={null}
```
Initialize Tonder's JS SDK instance with the following parameters:
| Field | Description |
| --------------- | ------------------------------------------------------------------------------------------------------------------------------------------------------------------------------------------------------------------------------- |
| `mode` | Environment mode. Options: `stage`, `production`, `sandbox`. Default: `stage` |
| `apiKey` | The API key used for authentication and authorization. |
| `returnUrl` | The URL to which the user is redirected after the checkout process, regardless of success or failure. |
| `customization` | This object is designed to customize the behavior of the checkout. It is used to adjust both the interface options and operational parameters. Refer to the [Customizations](#customizations) section for more details. |
| `styles` | Custom styles object that allows you to customize the appearance of the inline checkout. It may include properties such as colors, fonts, and other styling options. Refer to the [Styling](#styling) section for more details. |
```javascript npm package option theme={null}
import { InlineCheckout } from "tonder-web-sdk";
const inlineCheckout = new InlineCheckout({
apiKey,
returnUrl,
styles: customStyles,
customization
});
```
```javascript Script tag option theme={null}
const inlineCheckout = new TonderSdk.InlineCheckout({
apiKey,
returnUrl,
styles: customStyles,
customization
});
```
You can use the `configureCheckout` method to set initial customer information, such as their email address, allowing to retrieve the respectives user's saved cards.
```javascript theme={null}
inlineCheckout.configureCheckout({ customer: { email: "example@email.com" } });
```
Call the `injectCheckout` method with your inlineCheckout instance, with the code below:
```javascript theme={null}
inlineCheckout.injectCheckout();
```
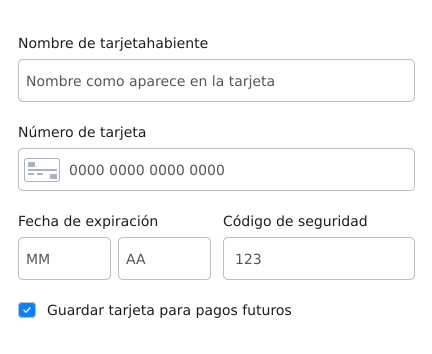
This method will use the element with id `tonder-checkout` added in Step 1 to render the checkout elements, as exemplified by the image below:
 With this, you can render the checkout to your customers.
Use Tonder's SDK `verify3dsTransaction()` method to validate if the 3DS challenge was successful or not. Use the example below to call the method and handle the response as needed:
```js theme={null}
inlineCheckout.verify3dsTransaction().then(response => {
console.log('Verify 3ds response', response);
if (response.transaction_status === 'Success') {
alert('3DS Transaction verified.');
// Proceed with normal payment flow
} else if (response.transaction_status === 'Failed') {
alert('3DS Transaction Failed');
}
});
```
Lastly, you need to create a button to submit the form. This button needs to have an event listener that calls the `payment` method from the `inlineCheckout` instance, sending the checkout data as payload, like presented below:
```javascript theme={null}
document.getElementById('your-pay-button').addEventListener('click', async () => {
try {
response = await inlineCheckout.payment(checkoutData);
if (response.transaction_status === 'Success') {
alert('Payment successful.');
} else if (response.transaction_status === 'Pending') {
alert('Payment pending. Redirecting to 3DS...');
// The redirection to 3DS occurs automatically
} else {
alert('Payment declined.');
}
} catch (error) {
alert('Error with payment.');
}
});
```
#### Checkout data
The payment function payload needs to be an object with detailed information about the customer, currency and cart. Below you find details abou each needed field:
| Field | Description |
| ----------- | ------------------------------------------------------------ |
| `firstName` | The first name of the customer. |
| `lastName` | The last name of the customer. |
| `country` | The country of residence for the customer. |
| `address` | The street address in the specified city for the customer. |
| `city` | The city of residence for the customer. |
| `state` | The state or region within the country for the customer. |
| `postCode` | The postal code or ZIP code of the address for the customer. |
| `email` | The email address for communication with the customer. |
| `phone` | The contact phone number for the customer. |
| Field | Description |
| ---------- | ----------------------------------------------------------------------------------------------- |
| `currency` | The currency used by the customer in [ISO 4217 format](https://en.wikipedia.org/wiki/ISO_4217). |
| Field | Description |
| ---------------------------- | ---------------------------------------------------------------- |
| `total` | The total amount for the customer's purchase. |
| `items` | An array containing details of individual items in the purchase. |
| `items[n].description` | The description of the first item. |
| `items[n].quantity` | The quantity of the first item in the purchase. |
| `items[n].price_unit` | The unit price of the first item. |
| `items[n].discount` | The discount applied to the first item. |
| `items[n].taxes` | The taxes applied to the first item. |
| `items[n].product_reference` | The reference number of the product for the first item. |
| `items[n].name` | The name of the first item (e.g., "T-Shirt"). |
| `items[n].amount_total` | The total amount for the first item. |
#### Checkout data example
Below you find an example of a checkout data object:
```javascript theme={null}
const checkoutData = {
customer: {
firstName: "Juan",
lastName: "Hernández",
country: "Mexico",
address: "Av. Revolución 356, Col. Roma",
city: "Monterrey",
state: "Nuevo León",
postCode: "64700",
email: "juan.hernandez@mail.com",
phone: "8187654321",
},
currency: 'mxn',
cart: {
total: 399,
items: [
{
description: "Black T-Shirt",
quantity: 1,
price_unit: 1,
discount: 0,
taxes: 0,
product_reference: 1,
name: "T-Shirt",
amount_total: 399,
},
]
}
};
```
## Customizations
Tonder's SDK customization object allows you to personalize the checkout behavior. You can change the following properties:
Learn how to securely allow your customers to save their card information.
## Styling
To learn how you can add your own styles to the checkout elements, refer to the [SDK Styles page](./js-sdk-styles).
## Full Integration Example
For full integration example codes, refer to the [Code Examples](/integration/sdks/web/code-examples) page.
With this, you can render the checkout to your customers.
Use Tonder's SDK `verify3dsTransaction()` method to validate if the 3DS challenge was successful or not. Use the example below to call the method and handle the response as needed:
```js theme={null}
inlineCheckout.verify3dsTransaction().then(response => {
console.log('Verify 3ds response', response);
if (response.transaction_status === 'Success') {
alert('3DS Transaction verified.');
// Proceed with normal payment flow
} else if (response.transaction_status === 'Failed') {
alert('3DS Transaction Failed');
}
});
```
Lastly, you need to create a button to submit the form. This button needs to have an event listener that calls the `payment` method from the `inlineCheckout` instance, sending the checkout data as payload, like presented below:
```javascript theme={null}
document.getElementById('your-pay-button').addEventListener('click', async () => {
try {
response = await inlineCheckout.payment(checkoutData);
if (response.transaction_status === 'Success') {
alert('Payment successful.');
} else if (response.transaction_status === 'Pending') {
alert('Payment pending. Redirecting to 3DS...');
// The redirection to 3DS occurs automatically
} else {
alert('Payment declined.');
}
} catch (error) {
alert('Error with payment.');
}
});
```
#### Checkout data
The payment function payload needs to be an object with detailed information about the customer, currency and cart. Below you find details abou each needed field:
| Field | Description |
| ----------- | ------------------------------------------------------------ |
| `firstName` | The first name of the customer. |
| `lastName` | The last name of the customer. |
| `country` | The country of residence for the customer. |
| `address` | The street address in the specified city for the customer. |
| `city` | The city of residence for the customer. |
| `state` | The state or region within the country for the customer. |
| `postCode` | The postal code or ZIP code of the address for the customer. |
| `email` | The email address for communication with the customer. |
| `phone` | The contact phone number for the customer. |
| Field | Description |
| ---------- | ----------------------------------------------------------------------------------------------- |
| `currency` | The currency used by the customer in [ISO 4217 format](https://en.wikipedia.org/wiki/ISO_4217). |
| Field | Description |
| ---------------------------- | ---------------------------------------------------------------- |
| `total` | The total amount for the customer's purchase. |
| `items` | An array containing details of individual items in the purchase. |
| `items[n].description` | The description of the first item. |
| `items[n].quantity` | The quantity of the first item in the purchase. |
| `items[n].price_unit` | The unit price of the first item. |
| `items[n].discount` | The discount applied to the first item. |
| `items[n].taxes` | The taxes applied to the first item. |
| `items[n].product_reference` | The reference number of the product for the first item. |
| `items[n].name` | The name of the first item (e.g., "T-Shirt"). |
| `items[n].amount_total` | The total amount for the first item. |
#### Checkout data example
Below you find an example of a checkout data object:
```javascript theme={null}
const checkoutData = {
customer: {
firstName: "Juan",
lastName: "Hernández",
country: "Mexico",
address: "Av. Revolución 356, Col. Roma",
city: "Monterrey",
state: "Nuevo León",
postCode: "64700",
email: "juan.hernandez@mail.com",
phone: "8187654321",
},
currency: 'mxn',
cart: {
total: 399,
items: [
{
description: "Black T-Shirt",
quantity: 1,
price_unit: 1,
discount: 0,
taxes: 0,
product_reference: 1,
name: "T-Shirt",
amount_total: 399,
},
]
}
};
```
## Customizations
Tonder's SDK customization object allows you to personalize the checkout behavior. You can change the following properties:
Learn how to securely allow your customers to save their card information.
## Styling
To learn how you can add your own styles to the checkout elements, refer to the [SDK Styles page](./js-sdk-styles).
## Full Integration Example
For full integration example codes, refer to the [Code Examples](/integration/sdks/web/code-examples) page.